Razer Wolverine V2 PRO User Manual
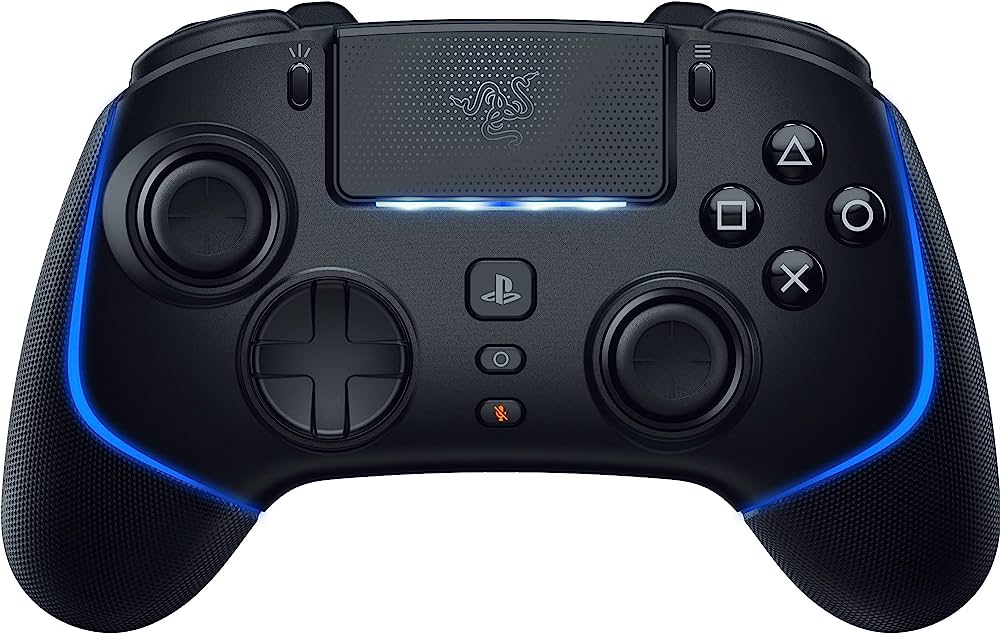
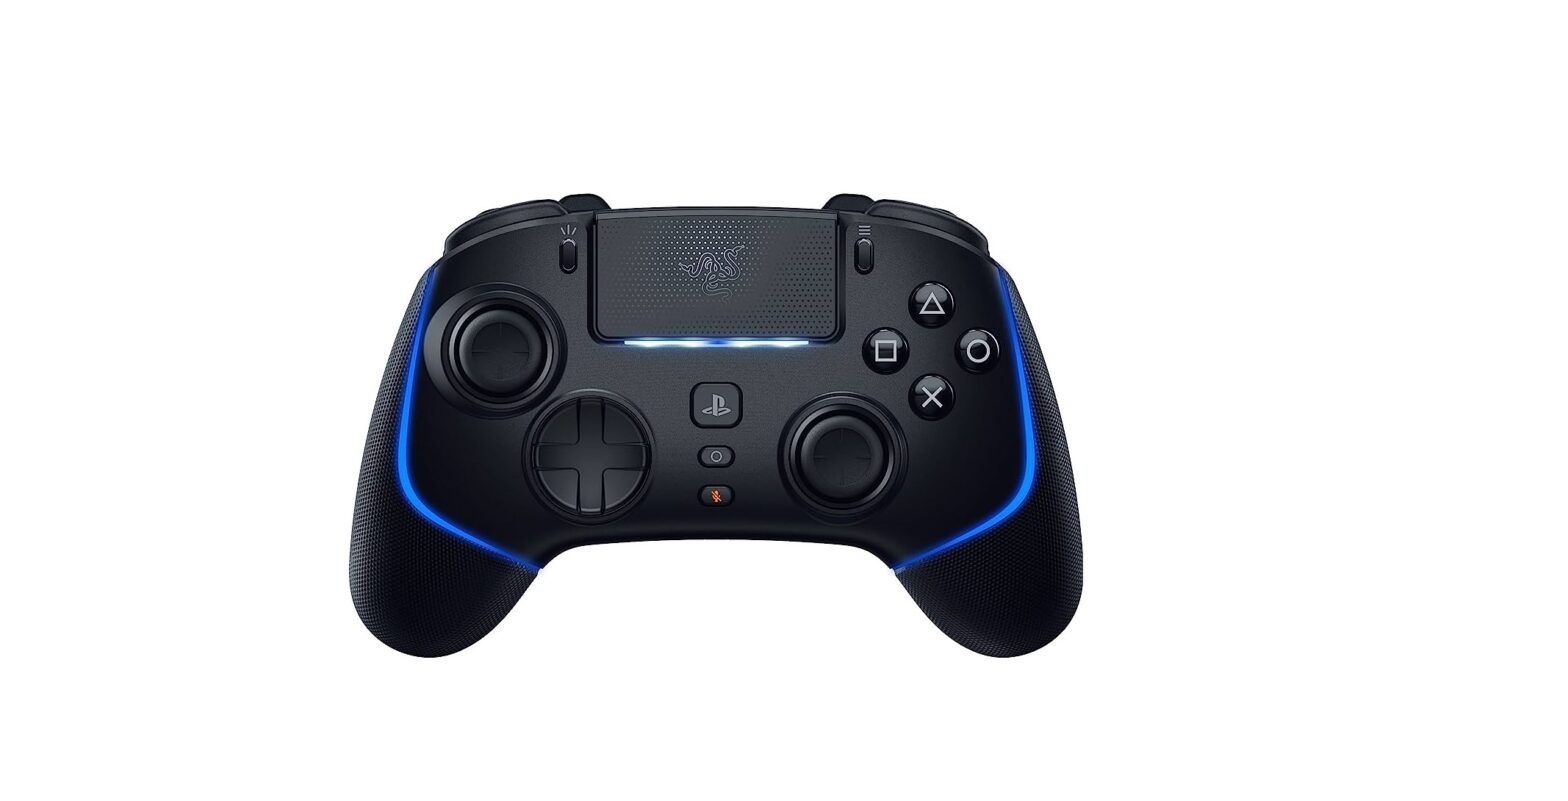
Pair the power of your next-gen system with the performance of a next-gen wireless pro controller. Officially licensed by PlayStation™, the Razer Wolverine V2 Pro is armed with Razer™ HyperSpeed Wireless and a full set of competitive features to deliver high-performance, low-latency gaming on PS5™ consoles and PC.
WHAT’S INSIDE
Razer Wolverine V2 Pro
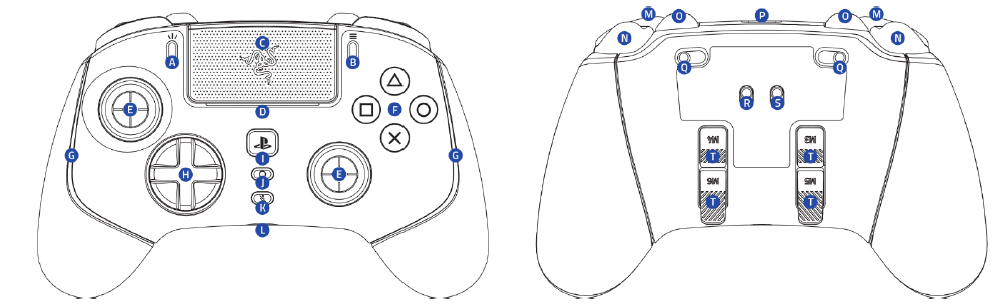
- A. Create button
- B. Options button
- C. Touch pad / Touch pad button
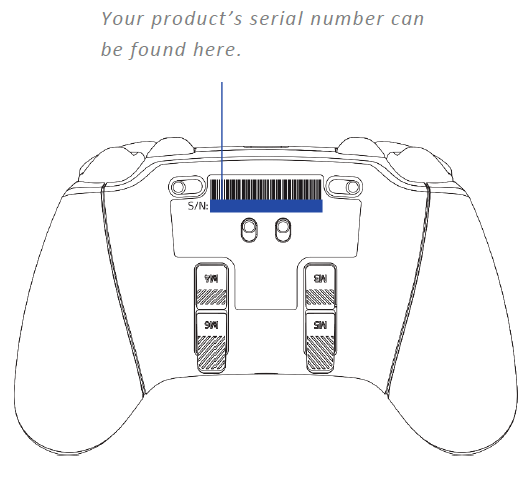
- D. LED status indicator*
- E. Standard thumbstick modules (L3 / R3)
- F. Razer™ Mecha-tactile action buttons
- G. Controller lighting Powered by Razer ChromaTM RGB
- H. 8-Way Microswitch D-Pad
- I. PS button
- J. Multi-function button
- K. 3.5 mm mic mute button (for 3.5 mm port)
- L. 3.5 mm analog audio port**
- M. Bumpers (L1 / R1)
- N. Razer HyperTriggers (L2 / R2)
- O. Multi-function bumpers (M1 – M2)
- P. USB Type C port
- Q. Trigger stop switches
- R. Connection mode switch (Wireless / Wired)
- S. Controller mode switch (PS5 / PC)
- T. Multi-function triggers (M3 – M6)

- Razer™ Hyper Speed Wireless 2.4 GHz USB Type A dongle
- USB Type A to USB Type C cable
2 additional thumbstick caps
Important Product Information Guide
WHAT’S NEEDED
PRODUCT REQUIREMENTS
- PS5TM console or PC (Windows® 10 64-bit or higher)*
- USB Type A port
RAZER CONTROLLER APP REQUIREMENTS
- iOS 13 / Android 10 (or higher) device with Bluetooth connectivity
- Internet connection for app installation
LET’S GET YOU COVERED
1 YEAR Register your product and score exclusive benefits razerid.razer.com/warranty
TECHNICAL SPECIFICATIONS
- Razer™ Mecha-Tactile Action Buttons
- 8-Way Microswitch D-Pad
- 6 Remappable Multi-Function Buttons
- Razer™ Hyper Trigger
- 3.5mm analog audio port compatible with PS5™ consoles and PC (Windows)
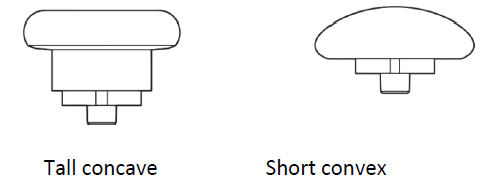
- 2 additional thumbstick caps (tall concave, short convex)
- Razer™ Hyper Speed Wireless 2.4GHz USB Type A dongle
- 9.8 ft / 3 m wired USB Type C to USB Type A cable
SETTING UP YOUR RAZER WOLVERINE V2 PRO
CHARGING THE CONTROLLER
Connect the Razer Wolverine V2 Pro to any of the USB ports on the PS5TM console or PC. The controller’s LED status indicator will breathe in orange while charging and turn off once fully charged.
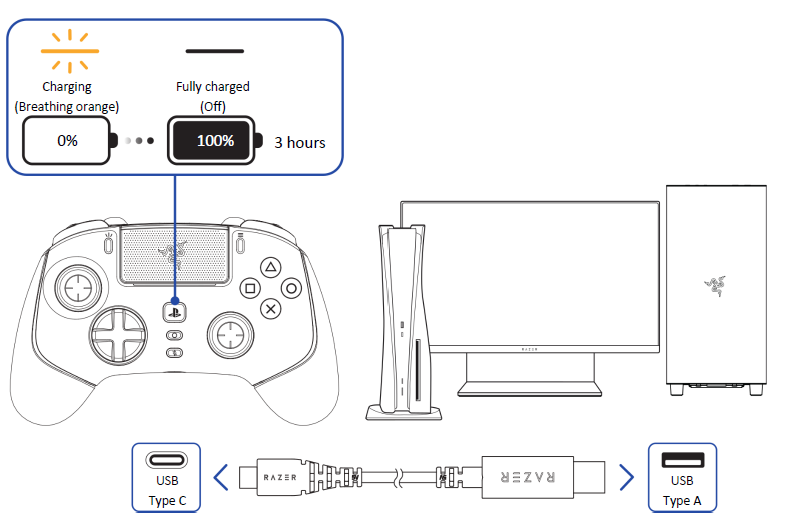
Only use the included USB Type A to USB Type C cable to charge the Razer controller. For best results, please fully charge the controller before using it for the first time. A depleted battery will be fully charged in approximately 3 hours.
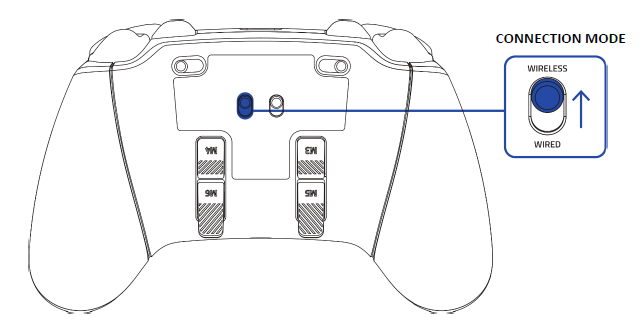
CONNECTING YOUR CONTROLLER
A. Via Wired mode
- Set the connection mode to Wired mode.
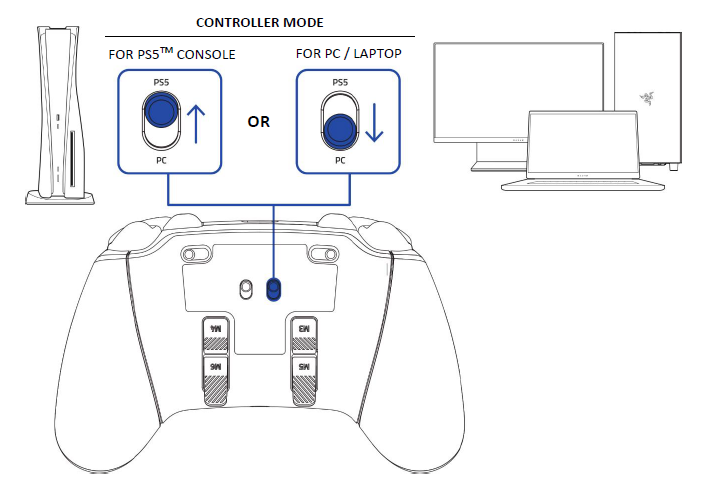
- Set the controller mode according to the intended device.
- Plug the controller into the PS5TM console or PC using the USB Type A to USB Type C cable.
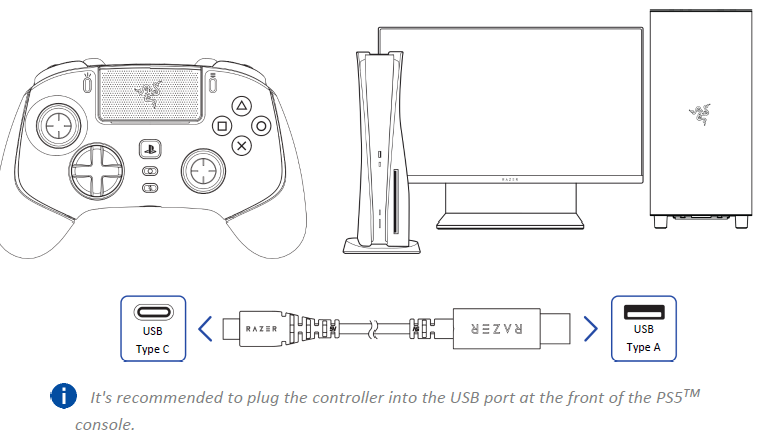
It’s recommended to plug the controller into the USB port at the front of the PS5TM console.
B. Via Wireless mode
- Set the connection mode to Wireless mode.
- Set the controller mode according to the intended device.
- Plug the USB Type A dongle into the PS5TM console or PC.
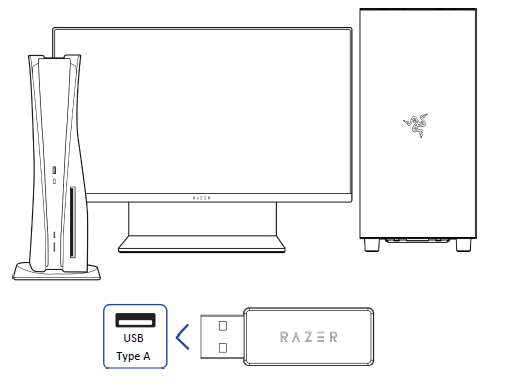
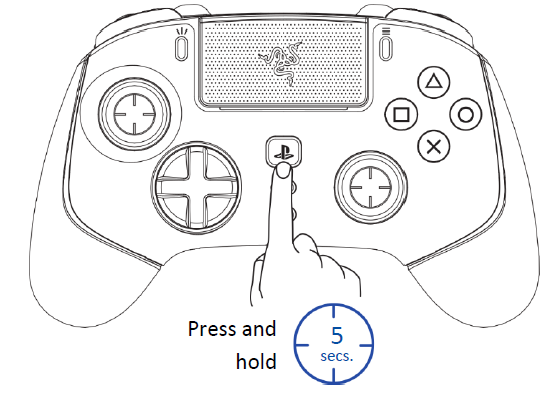
- Press and hold the PS button to power on the controller. The controller will automatically connect to the USB Type A wireless dongle.

PERSONALIZE YOUR EXPERIENCE
Download the Razer Controller app to customize the controller according to your playstyle. Remap the buttons, triggers, and bumpers to preferred commands and even experience full RGB lighting customization from your mobile device.

USING YOUR CONTROLLER
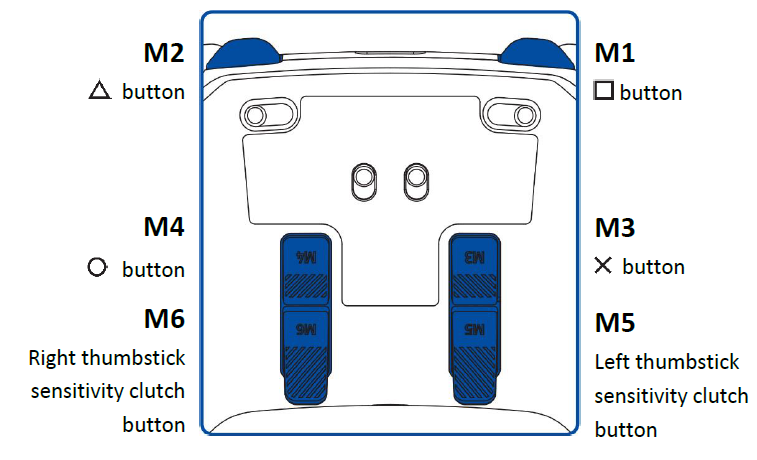
DEFAULT CONTROLLER MAPPING (M1 – M6)
By default, each of the controller’s buttons is mapped to a specific function, while the M1 / M2 bumpers and M3 -M6 triggers are mapped as follows:
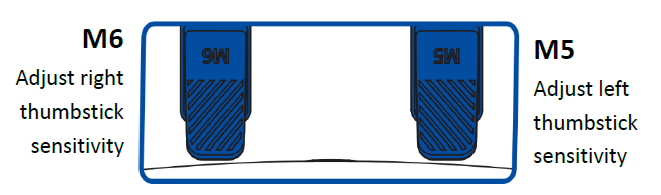
SENSITIVITY CLUTCH BUTTONS (M5 / M6)
By default, the M5 and M6 buttons are mapped as sensitivity clutch buttons for the left and right thumb sticks. When any of the sensitivity clutch buttons are held down, the sensitivity of the corresponding thumbstick will temporarily change, providing more options for aiming precision and ultrafast turns.
POWER ON / OFF (WIRELESS MODE ONLY)
Press and hold the PS button to power on or off the controller in wireless connection mode.
TRIGGER STOP SWITCHES
Enable the Trigger Stops to shorten the travel distance and response time (Active Hair Trigger Mode) of the Hyper Triggers (L2/R2) by sliding the Trigger Stop Switches outwards. To disable it, slide the switches inwards.

AUDIO CONNECTION VIA 3.5 MM PORT
Plug a 3.5 mm audio device* into the controller’s 3.5 mm analog audio port.
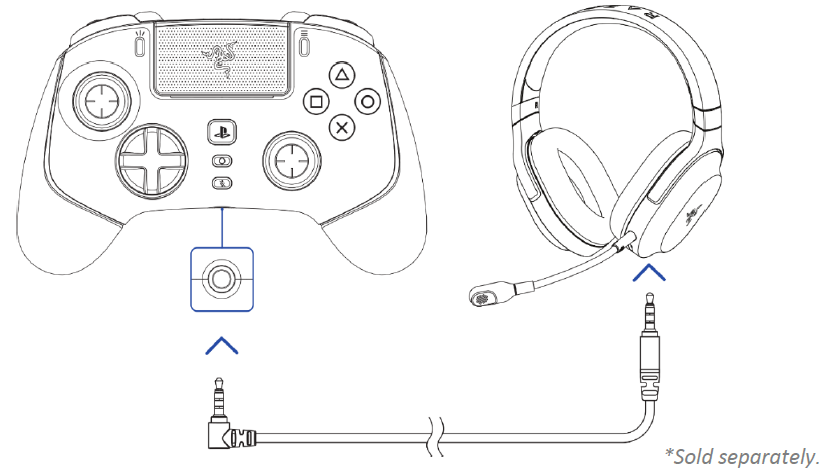
Audio function only available in PS5™ controller mode. When using the controller with compatible devices, set the Razer Wolverine V2 Pro as the default input and output device (if applicable).
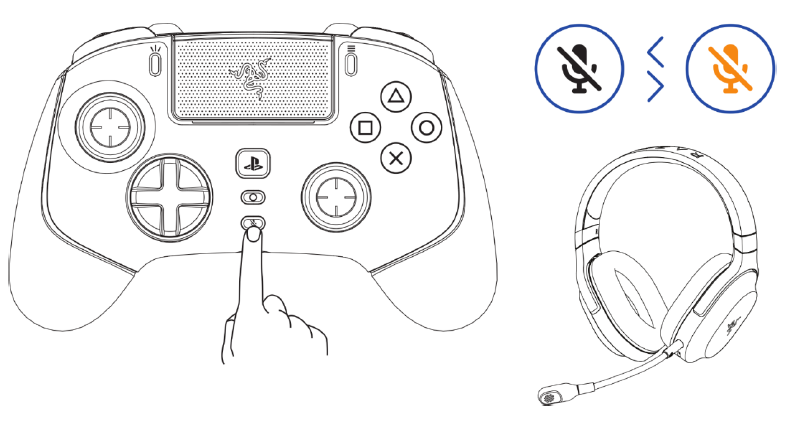
3.5 MM MIC MUTE BUTTON
Press the 3.5 mm mic mute button to mute or unmute the microphone of the connected audio device. When muted, the 3.5 mm mic mute button will light up in solid orange.
3.5 MM MIC MUTE BUTTON
ACTIVE: MUTED
MULTI-FUNCTION BUTTON
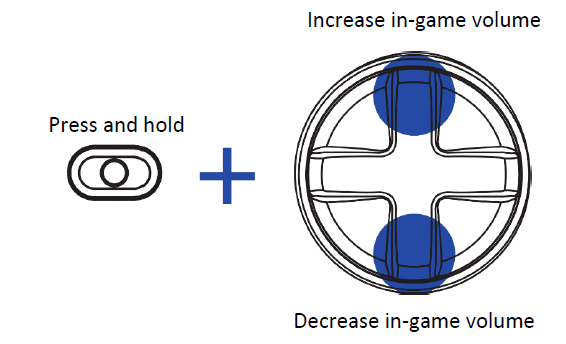
Use the Multi-function button to adjust the in-game volume or cycle between any of the stored profiles available in the controller.
Adjusting the in-game volume
To increase or decrease the in-game volume, press and hold the Multi-function button, then press the up or down directional button.
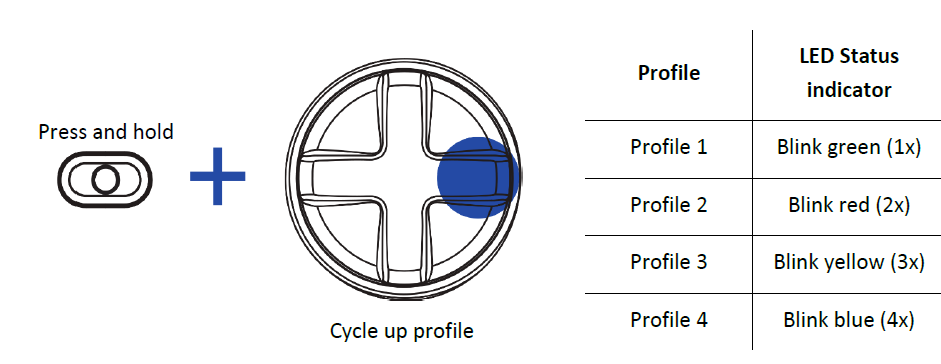
Cycling through stored profiles
Press and hold the Multi-function button, then press the Right directional button to cycle through the controller’s stored profiles. The LED status indicator will briefly show which profile is active as you cycle through profiles.
USING THE DETACHABLE THUMBSTICK CAPS
The Razer Wolverine V2 Pro includes additional tall and convex thumbstick caps, which you can use to replace the standard thumbstick modules to tailor the controller to your playstyle. Pull the standard modules to remove, then insert the preferred modules into the controller.

SAFETY AND MAINTENANCE
SAFETY GUIDELINES
To achieve maximum safety while using your Razer Kaira X, we suggest that you adopt the following guidelines: Should you have trouble operating the device properly and troubleshooting does not work, unplug the device and contact the Razer hotline or go to support.razer.com for assistance.
Don’t take apart the device, and do not attempt to operate it under abnormal current loads. Doing so will void your warranty. Keep the device away from liquid, humidity, or moisture. Operate the device only within the specific temperature range of 0°C (32°F) to 40°C (104°F).
Should the temperature exceed this range, unplug and/or switch off the device to let the temperature stabilize to an optimal level. The device isolates external ambient sounds even at low volumes, resulting in lowered awareness of your external surroundings. Please remove the device when engaging in activities requiring active awareness of your surroundings.
Listening to excessively loud volumes over extended periods can damage your hearing. Furthermore, legislation of certain countries permits a maximum sound level of 86db to affect your hearing for 8 hours a day. We, therefore, recommend that you reduce the volume to a comfortable level when listening for prolonged periods. Please, take good care of your hearing.
MAINTENANCE AND USE
The Razer Kaira X requires minimum maintenance to keep it in optimum condition. Once a month, we recommend you unplug the device and clean it using a soft cloth or cotton swab to prevent dirt buildup. Don’t use soap or harsh cleaning agents.
LEGALESE
COPYRIGHT AND INTELLECTUAL PROPERTY INFORMATION
©2022 Razer Inc. All rights reserved. Razer, the triple-headed snake logo, Razer logo, and “For Gamers. By Gamers.” are trademarks or registered trademarks of Razer Inc. and/or affiliated companies in the United States or other countries. All other trademarks are the property of their respective owners.
Windows and the Windows logo are trademarks of the Microsoft group of companies.
Razer Inc. (“Razer”) may have copyright, trademarks, trade secrets, patents, patent applications, or other intellectual property rights (whether registered or unregistered) concerning the product in this guide. Furnishing of this guide does not give you a license to any such copyright, trademark, patent or other intellectual property right. The Razer Kaira X (the “Product”) may differ from pictures whether on packaging or otherwise. Razer assumes no responsibility for such differences or for any errors that may appear. Information contained herein is subject to change without notice.
LIMITED PRODUCT WARRANTY
For the latest and current terms of the Limited Product Warranty, please visit razer.com/warranty.
LIMITATION OF LIABILITY
Razer shall in no event be liable for any lost profits, loss of information or data, special, incidental, indirect, punitive or consequential or incidental damages, arising in any way out of distribution of, sale of, resale of, use of, or inability to use the Product. In no event shall Razer’s liability exceed the retail purchase price of the Product.
GENERAL
These terms shall be governed by and construed under the laws of the jurisdiction in which the Product was purchased. If any term herein is held to be invalid or unenforceable, then such term (in so far as it is invalid or unenforceable) shall be given no effect and deemed to be excluded without invalidating any of the remaining terms. Razer reserves the right to amend any term at any time without notice.