
Insignia NS-MW07WH0 0.7 Cu. Ft. Compact Microwave User Manual
Compact Microwave
Introduction
Congratulations on your purchase of a high-quality Insignia product. Your NS-MW07WH0 or NS-MW07BK0 represents the state of the art in microwave design and is designed for reliable and trouble-free performance.
IMPORTANT SAFETY INSTRUCTIONS
WARNING:
To reduce the risk of burns, electric shock, fire, injury to persons, or exposure to excessive microwave energy:
- Read all instructions before using the appliance.
- Read and follow the specific PRECAUTIONS TO AVOID POSSIBLE EXPOSURE TO EXCESSIVE MICROWAVE ENERGY.
- This appliance must be grounded. Connect only to a properly grounded outlet. See GROUNDING INSTRUCTIONS.
- Install or locate this appliance only in accordance with the provided installation instructions.
- Do not operate the oven when empty.
- Some products such as whole eggs and sealed containers -for example, closed glass jars- are able to explode and should not be heated in this oven.
- Use this appliance only for its intended use as described in this manual. Do not use corrosive chemicals or vapors in this appliance. This type of oven is specifically designed to heat, cook, or dry food. It is not designed for industrial or laboratory use.
- As with any appliance, close supervision is necessary when used by children.
GROUNDING INSTRUCTIONS
This appliance must be grounded. In the event of an electrical short circuit, grounding reduces the risk of electric shock by providing an escape wire for the electric current. This appliance is equipped with a cord having a grounding wire with a grounding plug. The plug must be plugged into an outlet that is properly installed and grounded.
WARNING:
Improper use of the grounding plug can result in a risk of electric shock. Consult a qualified electrician or serviceman if the grounding instructions are not completely understood, or if doubt exists as to whether the appliance is properly grounded and if it is necessary to use an extension cord, use only a 3-wire extension cord that has a 3-blade grounding plug and a 3-slot receptacle that will accept the plug on the appliance. The marked rating of the extension cord shall be equal to or greater than the electrical rating of the appliance.
Electrical Requirements
The electrical requirements are 120 volts 60 Hz, AC only, and 15 amps. It is recommended that a separate circuit serving only the oven be provided. The oven is equipped with a 3-prong grounding plug. It must be plugged into a wall outlet properly installed and grounded.
Power Cord
- A short power supply cord is provided to reduce the risks resulting from becoming entangled in or tripping over a longer cord.
- Longer cord sets or extension cords are available and may be used if care is exercised in their use.
- If a long cord or extension cord is used:
- a) The marked electrical rating of the cord set or extension cord should be at least as great as the electrical rating of the appliance.
- b) The extension cord must be a grounding-type 3-wire cord, and the longer cord should be arranged so that it will not drape over the countertop or tabletop where it can be pulled on by children or tripped over unintentionally.
Materials you can use
| MATERIAL | REMARKS |
| Browning dish | Use to brown the exterior of small items such as steaks, chops, or pancakes. Follow the directions provided with your browning dish. Incorrect usage may cause the turntable to break. |
| Dinnerware | Use microwave-safe only. Follow the manufacturer’s instructions. Do not use cracked or chipped dishes. |
| Glassware | Use heat-resistant oven glassware only. Make sure there is no metallic trim. Do not use cracked or chipped dishes. |
| Oven cooking bags | Follow the manufacturer’s instructions. Do not close with a metal tie. Make slits to let steam escape. |
| Paper plates and cups | Use for short–term cooking/warming at low temperatures. Do not use recycled paper, which may contain metal and could ignite. |
| Paper towels | Use to cover food for reheating and absorbing fat. These absorb excess moisture and prevent spattering. Do not use recycled paper towels, which may contain metal and could ignite. |
| Parchment paper | Use as a cover to prevent splattering or a wrap for steaming. |
| Plastic | Use only if labeled “microwave safe.” Follow the manufacturer’s instructions. Some plastic containers soften as the food inside gets hot. “Boiling bags” and tightly closed plastic bags should be slit, pierced, or vented, as indicated on the package. |
| MATERIAL | REMARKS |
| Plastic wrap | Use microwave-safe only. Use to cover food during cooking to retain moisture. Do not let plastic wrap touch food. |
| Thermometers | Use only those labeled “microwave safe” and follow all directions. Check the food in several places.
Conventional thermometers can be used on microwaved food after the food has been removed from your microwave. |
| Wax paper | Use as a cover to prevent splattering and retain moisture. |
Materials to be avoided
| MATERIAL | REMARKS |
| Aluminum tray | May cause arcing. Use a microwave-safe dish instead. |
| Food carton with metal handle | May cause arcing. Use a microwave-safe dish instead. |
| Glass jars/bottles | Regular glass is too thin to be used in a microwave. It can shatter and cause damage and injury. |
| Metal or metal-trimmed utensils | Metal shields the food from microwave energy. The metal trim may cause arcing. |
| Metal twist ties | May cause arcing and could cause a fire in your microwave. |
| Paper bags | May cause a fire hazard, except for popcorn bags that are designed for microwave use. |
| Plastic foam | May melt or contaminate the liquid inside when exposed to high temperatures. |
| Plastic storage and food containers | Containers such as margarine tubs can melt in your microwave. |
| Wood | Wood dries out when used in your microwave and may split or crack. |
Features
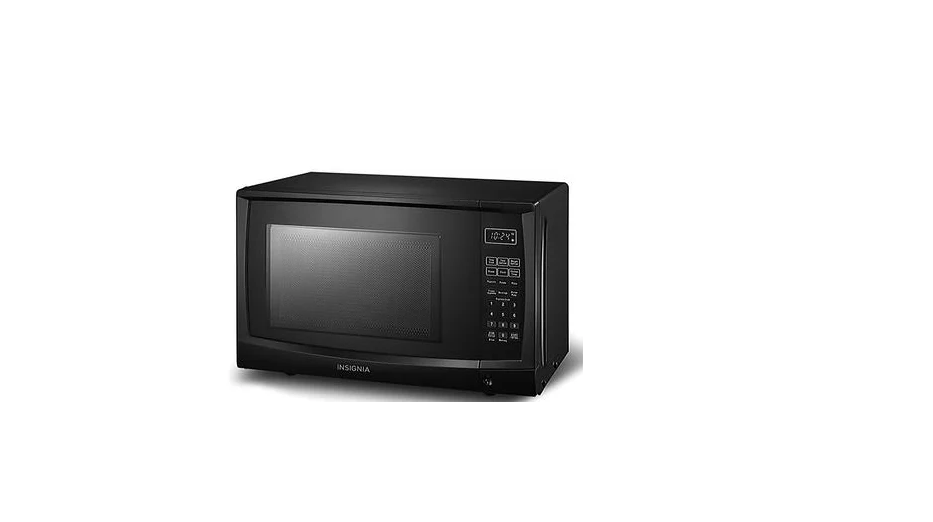
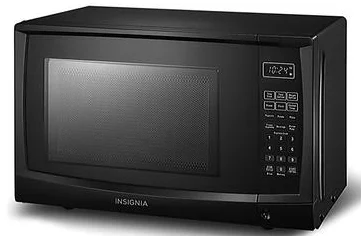
- .7 cu ft compact design saves counter space
- 700W with 11 power levels heats your food to perfection
- Six presets easily cook your favorite foods
- 9.6-inch (24.5 cm) turntable helps evenly heat food
- Internal light shows your food
Package contents
- Compact Microwave
- Turntable (with ring)
- User Guide
Microwave

| # | ITEM | DESCRIPTION |
| 1 | Safety interlock system | Prevents your microwave from operating when the door is open. |
| 2 | Oven window | Lets you see food while it is cooking. |
| 3 | Turntable shaft | Rotates the turntable assembly. |
| 4 | Turntable ring assembly | Lets the turntable rotate to cook food evenly. |
| 5 | Glass turntable | Helps food cook evenly. |
| 6 | Waveguide cover | Covers the waveguide. DO NOT REMOVE. |
| 7 | Control panel | Provides controls to set cooking times and enter other information as needed. |
| 8 | Door release button | Opens your microwave’s door. |
Control panel
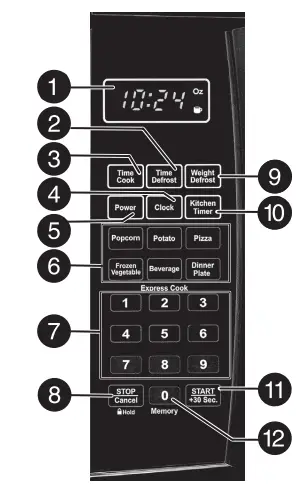
| # | ITEM | DESCRIPTION |
| 1 | Display | In standby mode, shows the time.
In cooking mode, shows cooking time, weight, and other information. |
| 2 | Time Defrost | Press, then enter the time you want for an item to defrost. See Defrosting by time on page 17. |
| 3 | Time Cook | Press to set the amount of time you want to heat your food, then press the number buttons to enter the time you want (up to 99 minutes and 99 seconds). |
| 4 | Clock | Press to set or check the clock. See Setting the clock on page 14. |
| 5 | Power | Press to set the power level of your microwave, then press the number buttons to set the level you want
(0-10). |
| 6 | Auto menu | Press one of these buttons to automatically cook the item indicated. See Cooking with the auto menus on page 15. |
| 7 | Number pad | Press to enter cook time, defrost time, clock time, and other information. |
| 8 | STOP/Cancel | Press to stop the cooking process. Press again to cancel the cooking operation. |
|
9 |
Weight Defrost |
Press, then enter the weight of the item you want to defrost. The cooking time is set automatically. See Defrosting by weight on page 17. |
| 10 | Kitchen Timer | Press this button, then enter the time you want to count down. See Using the kitchen timer on page 14. |
| 11 | START +30
Sec. |
In standby mode, press this button to begin cooking. While cooking, press this button to add 30 seconds to the cooking time. |
| 12 | 0/Memory | Press repeatedly to choose a memorized procedure. |
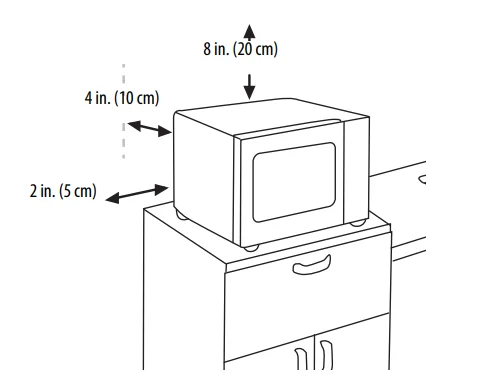
Setting up your microwave
- Remove all packing material, protective film, and accessories. Do not remove the light brown mica cover that is attached to the interior wall to protect the magnetron.
- Check for any damage such as dents or a broken door. Do not use your microwave if it is damaged.
- Select a level surface that provides enough open space for the vents.
CAUTION: Do not install your microwave over a range cooktop or other heat-producing appliance. Installing over a heat source can damage your microwave and voids your warranty.
- Plug your microwave into a power outlet.
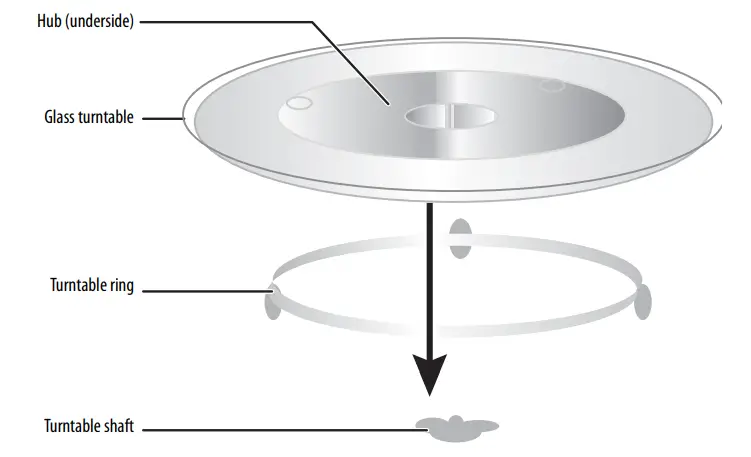
Installing the turntable
Note:
The turntable is shipped inside your microwave’s cooking chamber.
Notes:
- Never place the glass tray upside down. The glass tray should never be restricted.
- Both the glass tray and turntable ring must always be used during cooking.
- Always place all food and containers of food on the glass tray for cooking.
- If the glass tray or turntable ring cracks or breaks, contact your nearest authorized service center.
- Place the turntable ring in the round depression in the bottom of your microwave so that it turns freely.
- Place the glass turntable (flat side up) on the turntable ring so that the hub engages the turntable shaft in the bottom of your microwave. The glass turntable should not turn freely when it is correctly installed.
Defrosting in your microwave
You can use your microwave to defrost frozen food by entering a defrost time or the weight of the food.
Defrosting by time
- Press Time Defrost. The display shows “dEF2”.
- Use the number pad to enter the defrosting time you want. The time range must be between 00:01 and 99:99.
- Press START/+30SEC to start defrosting. The display shows the remaining defrosting time.
Defrosting by weight
When you enter the weight of the item, your microwave automatically adjusts the time and defrosting power.
- Press Weight Defrost. The display shows “dEF1”.
- Use the number pad to enter the weight of the item to be defrosted (in ounces). The input weight must be between 4 and 100 ounces.
- Press START/+30SEC to start defrosting. The display shows the remaining defrosting time. After 2/3 of the time elapses, your microwave pauses. 4 Press START/+30SEC to continue defrosting for the rest of the time.
Changing other microwave settings
Using the child lock
- To lock your microwave, press and hold STOP/Cancel for three seconds while in standby mode. Your microwave beeps and the display shows
 .
.
Note: The display does not show the time while your microwave is locked. - To unlock your microwave, press and hold STOP/Cancel for three seconds until your microwave beeps. Your microwave unlocks and goes into standby mode.
Checking the time or power level
- To check the time while cooking a meal, press Clock. The display shows the current time for three seconds, then returns to the cooking time remaining.
- To check the power level while using a microwave cooking program, press Power. The display shows the power level being used for three seconds, then returns to the cooking time remaining.
Cleaning and maintaining your microwave
Cleaning the outside of your microwave
Exterior
Clean the outside with a damp cloth. If needed you can use mild soap and water, then rinse and dry with a soft cloth. Do not use any type of household or abrasive cleaner. To prevent damage to the operating parts inside your microwave, make sure that water does not get into the ventilation openings.
Door
Wipe the window and door on both sides, the door seals, and adjacent parts with a damp cloth to remove any spills or spatters. Metal parts are easier to maintain if wiped frequently with a damp cloth. Avoid the use of spray and other harsh cleaners as they may stain, streak, or dull the door surface.
Control panel
If the control panel is dirty, open the microwave door before cleaning to prevent your microwave from turning on. Wipe the panel with a cloth dampened slightly with water only. Dry with a soft cloth. Do not scrub or use any sort of chemical cleaners. Close the door and press STOP/Cancel to clear any buttons you may have pressed.
Cleaning the inside of your microwave
Interior
Wipe with a soft cloth and warm water. Do not use abrasive or harsh cleaners or scouring pads. For baked-on food, use baking soda or a mild soap, then rinse thoroughly with hot water.
Waveguide cover
The waveguide cover is located on the side wall inside the microwave cavity. It is made from mica so requires special care. Keep the waveguide cover clean to assure good microwave performance. Carefully wipe with a damp cloth any food spatters from the surface of the cover immediately after they occur. Built-up splashes may overheat and cause smoke or possibly catch fire. DO NOT REMOVE THE WAVEGUIDE COVER.
Removing odors
Occasionally, a cooking odor may remain in your microwave. To remove, combine one cup (.25 L) of water, grated peel and juice of one lemon, and several whole cloves in a two-cup (.5 L) glass measuring cup. Boil for several minutes using 100% power, then let it cool in your microwave. Wipe the interior with a soft cloth.
Turntable
Remove the turntable and wash it in mild, sudsy water. For stubborn stains, use a mild cleanser and non-abrasive scouring sponge. You can also wash it in the top rack of a dishwasher. The turntable motor shaft is not sealed, so excess water or spills should be wiped up immediately. Clean the ring and the floor regularly to avoid excessive noise. Wipe the bottom surface of your microwave with mild detergent. Wash the ring in mild, soapy water or in a dishwasher. When removing the ring, make sure that you replace it in its original position.
Troubleshooting
If you have a problem with your microwave, review the following chart for a possible solution. If your microwave still does not work properly, contact the nearest authorized service center.
| PROBLEM | POSSIBLE CAUSE | POSSIBLE SOLUTION |
| The microwave does not start | The electrical cord is not plugged in. | Plug in the electrical cord. |
| The door is open. | Close the door and try again. | |
| The wrong operation is set. | Check the instructions and try again. | |
Arcing or sparking in my microwave |
You are trying to use incorrect materials in your microwave. | Use only microwave-safe materials. |
| You are trying to use your microwave when it’s empty. | Do not operate your microwave when it’s empty. | |
| Spilled food remains in your microwave. | Clean your microwave with a wet towel. | |
| Microwave has a bad odor | This is normal for new appliances. | The odor disappears after you use your microwave a few times. |
| Sometimes food leaves an odor in your microwave. | See Removing odors on page 19. |
Unevenly cooked foods |
You are trying to use incorrect materials in your microwave. | Use only microwave-safe materials. |
| The food is not defrosted completely. | Defrost the food completely before trying to cook it. | |
| The cooking time or power level is not adequate to cook the food. | Use the correct cooking time and power level. | |
| The food is not turned or stirred. | Turn or stir the food. | |
| Overcooked foods | The cooking time is too long or power level is too high. | Use the correct cooking time and power level. |
| Undercooked foods | You are trying to use incorrect materials in your microwave. | Use only microwave-safe materials. |
| The food is not defrosted completely. | Defrost the food completely before trying to cook it. | |
| The cooking time is too short or power level is too low. | Use the correct cooking time and power level. | |
| Your microwave ventilation ports are blocked or restricted. | Make sure that the ventilation ports are not blocked or restricted. | |
Improper defrosting |
You are trying to use incorrect materials in your microwave. | Use only microwave-safe materials. |
| The cooking time or power level is not adequate to cook the food. | Use the correct cooking time and power level. | |
| The food is not turned or stirred. | Turn or stir the food. | |
| The “:” colon on the display is blinking | This is normal behavior. | The colon blinks to count seconds when the clock is set. |
| The program stops working | If any button on the control panel sticks for one minute, the display shows “FAIL”, and a beep will sound once every minute. | If your microwave oven is within one year of purchase, contact Insignia Customer Service. |
| If any button on the control panel sticks permanently, a beep will sound once every minute. |
Specifications
| Model | NS-MW07WH0 or NS-MW07BK0 |
| Rated voltage | 120V / 60Hz |
| Rated input power | 1,100W |
| Rated output power | 700W |
| Operation Frequency | 2450MHz |
| Microwave capacity | .7 cu. ft. (19.8 L) |
| Turntable diameter | 9.6 in. (24.5 cm) |
| External dimensions (H × W × D) | 10.3 × 17.8× 12.4 in. (26.3 × 45.2 × 31.6 cm) |
| Power cord length | 33.9 in. (86 cm) |
| Net weight | 23.1 lbs. (10.5 kg) |
ONE-YEAR LIMITED WARRANTY
Definitions:
The Distributor* of Insignia branded products warrants to you, the original purchaser of this new Insignia-branded product (“Product”), that the Product shall be free of defects in the original manufacturer of the material or workmanship for a period of one (1) year from the date of your purchase of the Product (“Warranty Period”). For this warranty to apply, your Product must be purchased in the United States or Canada from a Best Buy branded retail store or online at www.bestbuy.com or www.bestbuy.ca and is packaged with this warranty statement.
What does this warranty cover?
During the Warranty Period, if the original manufacture of the material or workmanship of the Product is determined to be defective by an authorized Insignia repair center or store personnel, Insignia will (at its sole option): (1) repair the Product with new or rebuilt parts, or (2) replace the Product at no charge with new or rebuilt comparable products or parts. Products and parts replaced under this warranty become the property of Insignia and are not returned to you. If service of Products or parts is required after the Warranty Period expires, you must pay all labor and parts charges. This warranty lasts as long as you own your Insignia Product during the Warranty Period. Warranty coverage terminates if you sell or otherwise transfer the Product.
What does the warranty not cover?
This warranty does not cover:
- Food, beverage, and/or medicine loss/spoilage.
- Customer instruction/education
- Installation
- Set up adjustments
- Cosmetic damage
- Damage due to weather, lightning, and other acts of God, such as power surges
- Accidental damage
- Misuse
- Abuse
- Negligence
- Commercial purposes/use, including but not limited to use in a place of business or in communal areas of a multiple dwelling condominium or apartment complex, or otherwise used in a place other than a private home.
- Modification of any part of the Product, including the antenna
- Display panel damaged by static (non-moving) images applied for lengthy periods (burn-in).
For product inquiries, please contact us with the information below:
- 1-877-467-4289
- www.insigniaproducts.com
- INSIGNIA is a trademark of Best Buy and its affiliated companies.
- Distributed by Best Buy Purchasing, LLC
- 7601 Penn Ave South, Richfield, MN 55423 U.S.A.
- ©2022 Best Buy. All rights reserved.
DOWNLOAD PDF LINK