Black & Decker Single-Serve Coffeemaker User Manual
Single-Serve Coffeemaker
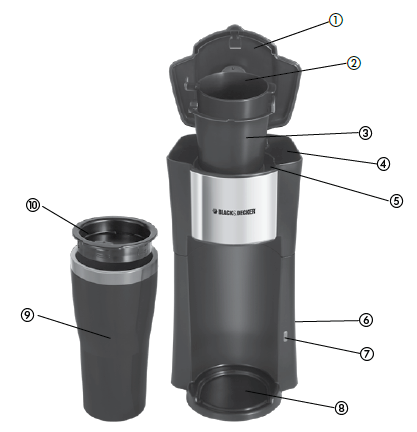
- Cover
- Permanent filter (Part # CM618-01)
- Removable filter basket (Part # CM618-02)
- Water reservoir
- Filter basket holder
- Start switch
- Power indicator light
- Mug rest
- 16-oz. thermal travel mug
- Model CM618 (Part # CM618-03)
- Model CM618S (Part # CM618S-03)
- Model CM618R (Part # CM618R-03)
- Model CM618T (Part # CM618T-03)
- Mug lid (Part # CM618T-04)
Note: indicates consumer replaceable/removable parts
MODELS
- CM618
- CM618S
- CM618R
- CM618T
Please Read and Save this Use and Care Book.
IMPORTANT SAFEGUARDS
When using electrical appliances, basic safety precautions should always be followed to reduce the risk of fire, electric shock, and/or injury to persons, including the following:
- Read all instructions.
- Do not touch hot surfaces. Use handle or knobs.
- To protect against electric shock, do not place cord, plug or appliance in water or other liquids.
- Close supervision is necessary when any appliance is used by or near children.
- Unplug from outlet when not in use and before cleaning. Allow to cool before putting on or taking off parts and before cleaning the appliance.
- Do not operate any appliance with a damaged cord or plug or after the appliance malfunctions, or has been damaged in any manner. Return the appliance to the nearest authorized service facility for examination, repair, or adjustment.
- The use of an accessory not evaluated for use with this appliance may cause injuries.
- Do not use outdoors.
- Do not let cord hang over the edge of table or counter, or touch with hot surfaces.
- Do not place on or near a hot gas or electric burner or in a heated oven.
- Do not use this appliance for other than intended use.
- Keep the lid on the carafe when in use.
- Scalding may occur if the lid is removed during the brewing cycles.
SAVE THESE INSTRUCTIONS.
This product is for household use only.
POLARIZED PLUG (120V Models Only)
This appliance has a polarized plug (one blade is wider than the other). To reduce the risk of electric shock, this plug is intended to fit into a polarized outlet only one way. If the plug does not fit fully into the outlet, reverse the plug. If it still does not fit, contact a qualified electrician. Do not attempt to modify the plug in any way.
TAMPER-RESISTANT SCREW
Warning: this appliance is equipped with a tamper-resistant screw to prevent removal of the outer cover. to reduce the risk of fire or electric shock, do not attempt to remove the outer cover. There are no user-serviceable parts inside. Repair should be done only by authorized service personnel.
ELECTRICAL CORD
- a) A short power-supply cord (or detachable power-supply cord) is to be provided to reduce the risk resulting from becoming entangled in or tripping over a longer cord.
- b) Longer detachable power-supply cords or extension cords are available and may be used if care is exercised in their use.
- c) If a long detachable power-supply cord or extension cord is used,
- The marked electrical rating of the detachable power-supply cord or extension cord should be at least as great as the electrical rating of the appliance,
- If the appliance is of the grounded type, the extension cord should be a grounding-type 3-wire cord, and
- The longer cord should be arranged so that it will not drape over the countertop or tabletop where it can be pulled on by children or tripped over.
Note: If the power supply cord is damaged, it should be replaced by qualified personnel.
How to Use
This product is for household use only.
GETTING STARTED
- Wash removable parts as instructed in CARE AND CLEANING.
- Pour fresh cold water up to Max level mark into the water reservoir.
- Place permanent filter into removable filter basket. Place basket into filter basket holder.
- Plug cord into standard electrical outlet.
- Brew water through as instructed in BREWING COFFEE, but do not add coffee grounds or soft pods. When finished, discard the water from the mug.
BREWING COFFEE WITH LOOSE GROUND COFFEE
- Lift cover. Pour cold water up to the Max fill line in the water reservoir (unless using the instructions in the following note).
Note: If desired, before placing mug on the mug rest, remove the lid from the travel mug and add sweetener, cream or milk to the mug before brewing; replace the lid before placing mug on the mug rest. If using this tip do not fill reservoir to Max line; leave space in reservoir to allow for room in mug once coffee is brewed. - Place the filter basket into the filter basket holder at the top of the coffeemaker with the handle to the left and the center notch resting securely at the center back.
- Place the permanent filter into the filter basket with the handle to the right until it rests securely in the filter basket.
- Add ground coffee (we recommend approximately 3 tablespoons). Close the cover.
- Place thermal travel mug with the lid securely in place on the mug rest directly under the filter basket opening.
- Press the Start switch; the power indicator light illuminates. The coffeemaker and power indicator light turn off automatically when brewing is finished. Allow coffee to finish dripping from the unit before removing your travel mug.
Note
There will be slightly less coffee in your travel mug than the amount of water added, as the grounds absorb some of the liquid.
Tip: Your coffeemaker can also be used to brew hot water for other hot beverages such as tea, hot chocolate, instant oatmeal and soups. To brew hot water and avoid coffee flavor, remove the permanent filter and basket and follow the brewing process (without adding grounds).
Caution: Be careful when opening the cover after brewing as this area is hot and steamy. Use the lift tab located on the front of the cover.
BREWING COFFEE WITH SOFT PODS
- Lift cover. Pour cold water up to the Max fill line in the water reservoir (unless following Note after step 1 in BREWING COFFEE WITH LOOSE COFFEE GROUNDS ).
- Place one soft pod (70 mm) in the filter basket. Place the second soft pod in the permanent filter; we recommend 2 soft pods for 16 ounces.
- Place the filled permanent filter and filter basket into the coffee maker as instructed in steps 2 and 3 in Brewing Coffee with Loose Coffee Grounds. Close the cover.
- Place the thermal travel mug with the lid securely in place on the mug rest directly under the filter basket opening.
- Press the Start switch; the power indicator light illuminates. The coffeemaker and power indicator light turn off automatically when brewing is finished. Allow the coffee to finish dripping from the unit before removing your travel mug. Refer to the information below step 5 in BREWING COFFEE WITH LOOSE COFFEE GROUNDS.
Note: If the Start switch is on even if is pressed before plugging the cord and the indicator light illuminates as soon as the cord is plugged in.
Care and Cleaning
This product contains no user serviceable parts. Refer service to qualified service personnel.
CLEANING
- Be sure the coffeemaker is off and cooled. Open the cover, remove the permanent filter and filter basket (lift straight up) and discard the grounds or soft pods. Clean as follows: filter basket, permanent filter, thermal traveler mug and mug lid are all top rack dishwasher-safe; or they may be hand-washed in warm, soapy water. The coffeemaker’s exterior may be cleaned with a soft damp cloth.
Important: Do not use abrasive cleansers or scouring pads. Never immerse the coffeemaker in water. - To clean inside of cover, open the cover allowing it to rest in the open position. Pull the showerhead to release from under the tab and wipe the surface with a clean damp cloth. After cleaning, insert showerhead back in position.
CLEANING WITH VINEGAR
Mineral deposits left by hard water can clog your coffeemaker. Cleaning is recommended once a month. Excessive steaming or a prolonged brewing cycle is a sign that a cleaning is needed.
- Fill the mug about ¹⁄³ full with white vinegar and then to the MAX line cold water and pour into the water reservoir.
- Place the mug on the mug rest.
- Press the Start switch and let the cleaning solution brew through until the unit shuts off automatically.
- Repeat the process using a new solution; do not reuse the first solution.
- Use the mug to fill the reservoir with cold water and brew the plain water through to flush out any remaining solution. You may have to repeat the plain water cycle to remove any remaining vinegar taste
- Wash and dry the permanent filter, filter basket, lid and mug as instructed in CLEANING.
WARNING
RISK OF FIRE OR ELECTRIC SHOCK. DO NOT OPEN.
The lightning symbol refers to “dangerous voltage”; the exclamation symbol refers to maintenance instructions. See below.
Warning: To reduce the risk of fire or electric shock, do not remove the cover of the coffeemaker. There are no user-serviceable parts inside. Repair should be done by authorized service personnel only.
NEED HELP?
For service, repair or any questions regarding your appliance, call the appropriate 800 number in front of this sheet. Please DO NOT return the product to the place of purchase. Also, please DO NOT mail product back to manufacturer, nor bring it to a service center. You may also want to consult the website listed on the cover of this manual.
TWO-YEAR LIMITED WARRANTY
(Applies only in the United States and Canada)
- What does it cover?
Any defect in material or workmanship provided; however, Applica’s liability will not exceed the purchase price of product. - For how long?
Two years from the date of original purchase with proof of such purchase. - What will we do to help you?
Provide you with a reasonably similar replacement product that is either new or factory refurbished. - How do you get service?
Save your receipt as proof of date of sale.
is a registered trademark of The Black & Decker Corporation, Towson, Maryland, USA