Black & decker Portable Work Bench Manual
Assembly Instructions
NOTE: For assembly of the WM125 Workmate you will need a hammer, flat bladed screwdriver and the provided nut driver part (U). Assembly time is approximately 45 minutes to one hour. Follow the sequence shown in the diagrams and described in the steps below.
The no 1 STEP :
- Empty the contents of the box and identify all components.
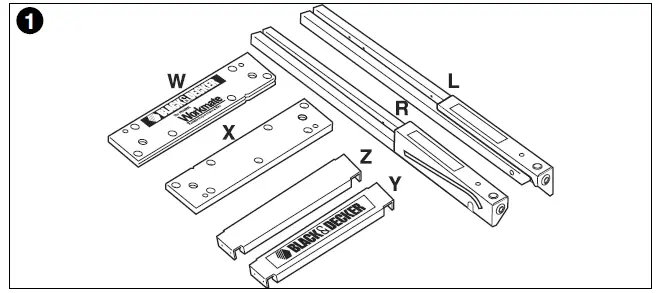
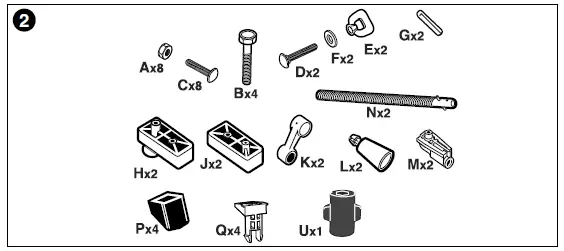
2 Move:
- Empty the contents of the parts pack and identify all components
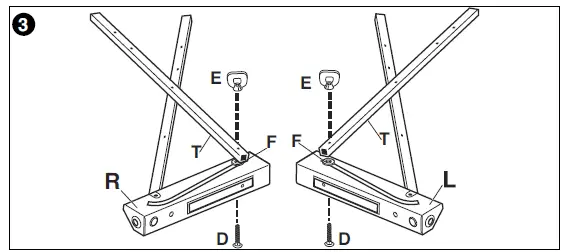
Phrase 3:
- Guide carriage bolt (D) through slot in vise bracket of assembly (L), spacer (F) outer leg (T) and secure with locking knob (E). Repeat this step using assembly (R).
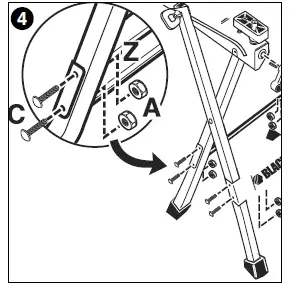
Stage 4:
- Place the rear bracket (Z) over the legs,align holes and secure with Pan Head bolt, M6 x 30mm (C) and M6 nut (A).Use flat bladed screwdriver and nut driver (U) to secure.
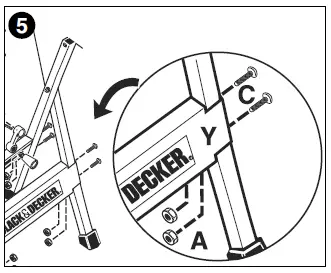
5 Stage :
- Place the front bracket (Y) over the legs,align holes and secure with Pan Head bolt, M6 x 30mm (C) and M6 nut (A). Use flat bladed screwdriver and nut driver (U) to secure.
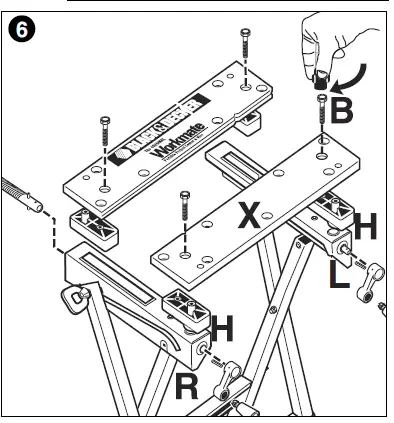
The STEP 6:
- Place front slide blocks (H) onto the leg assemblies (L) and (R) as shown.
- Place vise jaw (X), V-groove facing towards clamp edge, over the two slide blocks (H).
- Insert two self-threading hex head bolts (B), through the recessed holes in the jaw and tighten securely with nut driver (U).
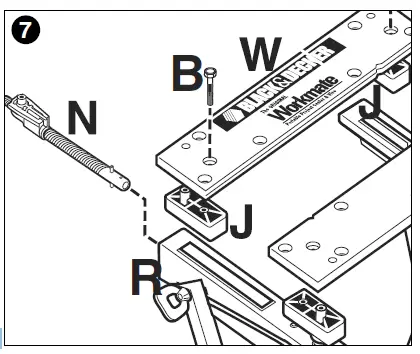
7th STEP :
- Insert non-threaded rod end of pre-assembled vise screw and pivot nut assembly (N) through front hole of leg assembly (R).Repeat with other pivot nut and vise screw using front hole of leg assembly (L).
- Place the two rear slide blocks (J) over pivot nuts of screw assembly (N).
- Place the rear vise jaw (W),V-groove facing towards clamp edge, over the slide blocks (J).
- Insert two self-threading hex head bolts (B), through them recessed holes in the jaw and tighten securely with nut driver (U).
Move 8 Push the Snap-in Knobs (L) into the handle arms (K) as shown.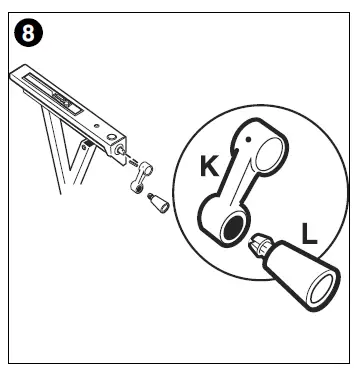
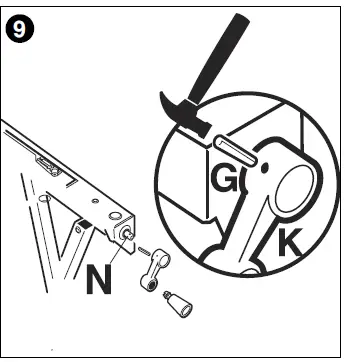
9 Phrase :
- Place handle arm (K) over the vise screw rod end (N), align holes and secure the roll pin (G) using a hammer.
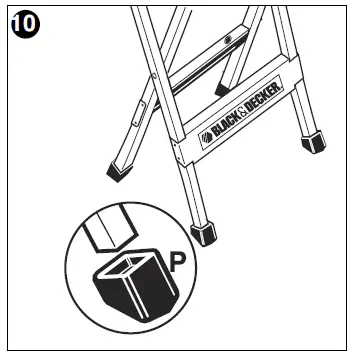
No 10 STEP :
- Install the rubber feet (P) to bottom of legs as shown. Note correct orientation of feet.
Closing and Storage
- Loosen both locking knobs (E). (Step 11)
- While holding the jaws as shown, tilt the Work Center towards you while lifting up on the front jaw. The Work Center will begin to swing closed.
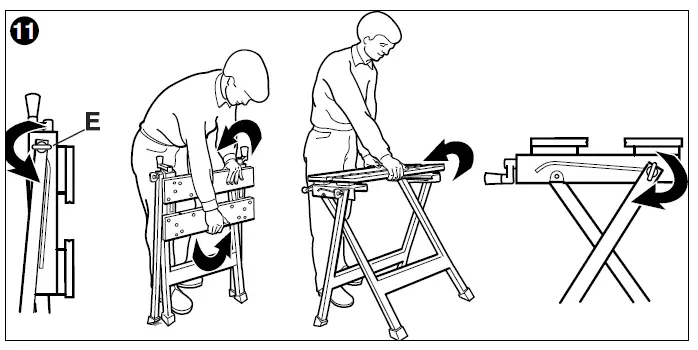
WARNING: – PINCH HAZARD DO NOT PLACE FINGERS NEAR WORK CENTER LEGS WHEN CLOSING.
Holding irregular shapes with Workmate® Work Center
Using the swivel pegs (Q) in the appropriate holes and the independent action of both vise handles, the Work Center can secure the most irregular shapes. It lets you grip objects that used to be impossible to hold. Rotate swivel pegs to accept irregular shapes. Outside swivel pegs extend capacity for the diagonal grip with jaws fully open.
WORKCENTER
The Work Center is a vise and workbench all in one. Its basic design and special features help you perform a complete range of workshop tasks from the simplest to the most complicated. The heart of the Work Center is in the action of the two parallel vise jaws,The two vise handles adjust the jaws to a maximum of 4 1/2 inches (114mm) jaw opening.
Working with your Workmate® Work Center
Because each handle works independently, the opening can be tapered from 0 inches to 5 inches (127mm) maximum. Use of the swivel pegs in the appropriate vise holes extends the vise capacity of the Work Center up to 10-1/2 inches (266mm) parallel clamping and 22-1/2 inches (570mm) when objects are held diagonally. The Work Center is a useful sawhorse and holds material securely.
NOTE: Place your foot on the bracket of the Work Center to steady it. DO NOT USE AS A STEP.
ACCESSORIES
Recommended accessories for use with your tool are available from your local dealer or authorized service center. If you need assistance regarding accessories, please call: 1-800-544-6986.
FULL TWO-YEAR HOME USE WARRANTY
Black & Decker (U.S.) Inc. warrants this product for two years against any defects in material or workmanship. The defective product will be replaced or repaired at no charge in either of two ways.The first, which will result in exchanges only, is to return the product to the retailer from whom it was purchased (provided that the store is a participating retailer).
WARRANTY
Returns should be made within the time period of the retailerʼs policy for exchanges (usually 30 to 90 days after the sale). Proof of purchase may be required. Please check with the retailer for their specific return policy regarding returns that are beyond the time set for exchanges
FREE WARNING LABEL REPLACEMENT:
If your warning labels become illegible or are missing, call 1-800-544-6986 for a free replacement.
LATIN AMERICA: This warranty does not apply to products sold in Latin America. For products sold in Latin America, check country specific warranty information contained in the packaging, call the local company or see the website for warranty information.